My girlfriend was deployed for the US Army over the last year – a difficult time for her — so I wanted her to come home to the lawn of her dreams.
Here’s a summary of the work, process and pics for DIY education and pro feedback.
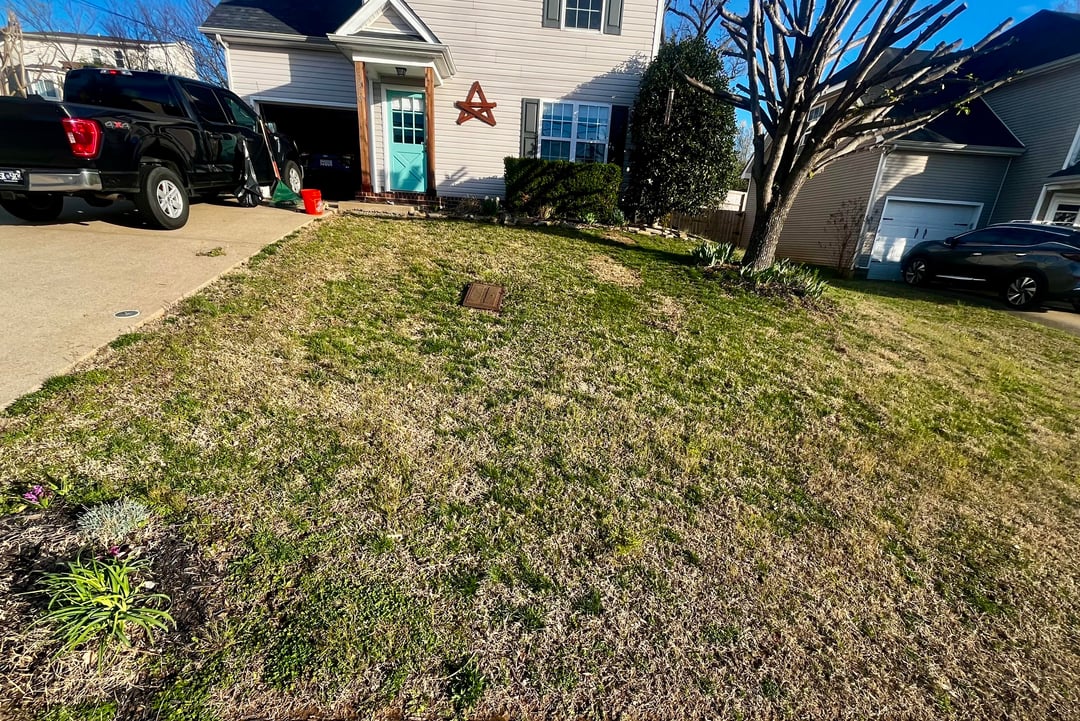
Pre-Work SIte Review
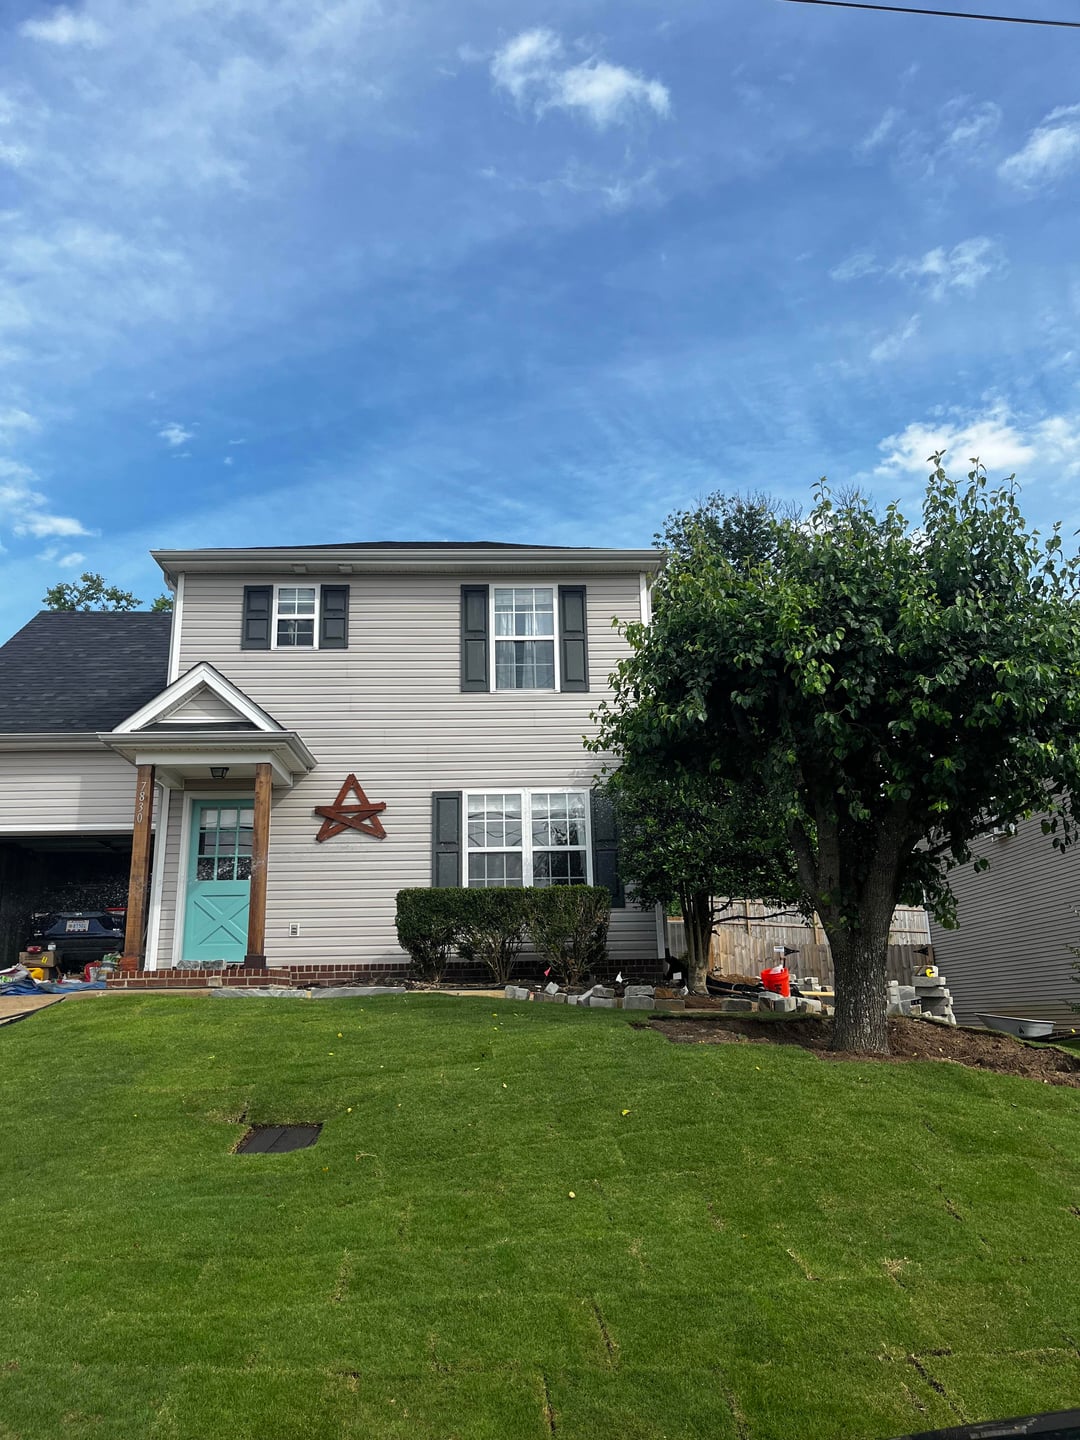
Front lawn consisted mostly of weeds and a high density crabgrass.
Very bad soil PH (~2 to 3) with heavy deposits of rock, stone and clay made developing a lawn from seeding impossible.
Home inspection at purchase identified downspout and storm drainage as a need to prevent further erosion to prevent problems with the slab foundation. That was over 10 years ago and significant erosion was evident.
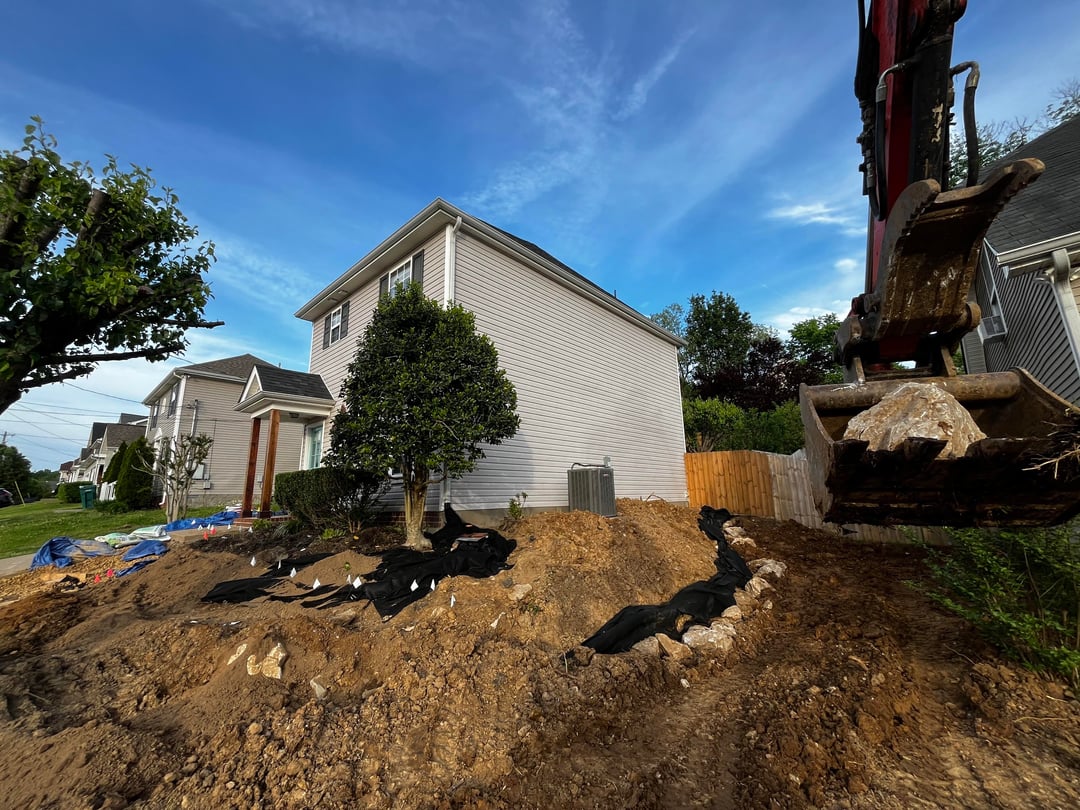
The grade was extremely steep immediately against the house 15 to 25%. In addition to mitigating future erosion, there was also a need to add material along the house to replace what’s been lost over the years.
Project Objectives
Scrape and remove the top layer of bad soil/grass
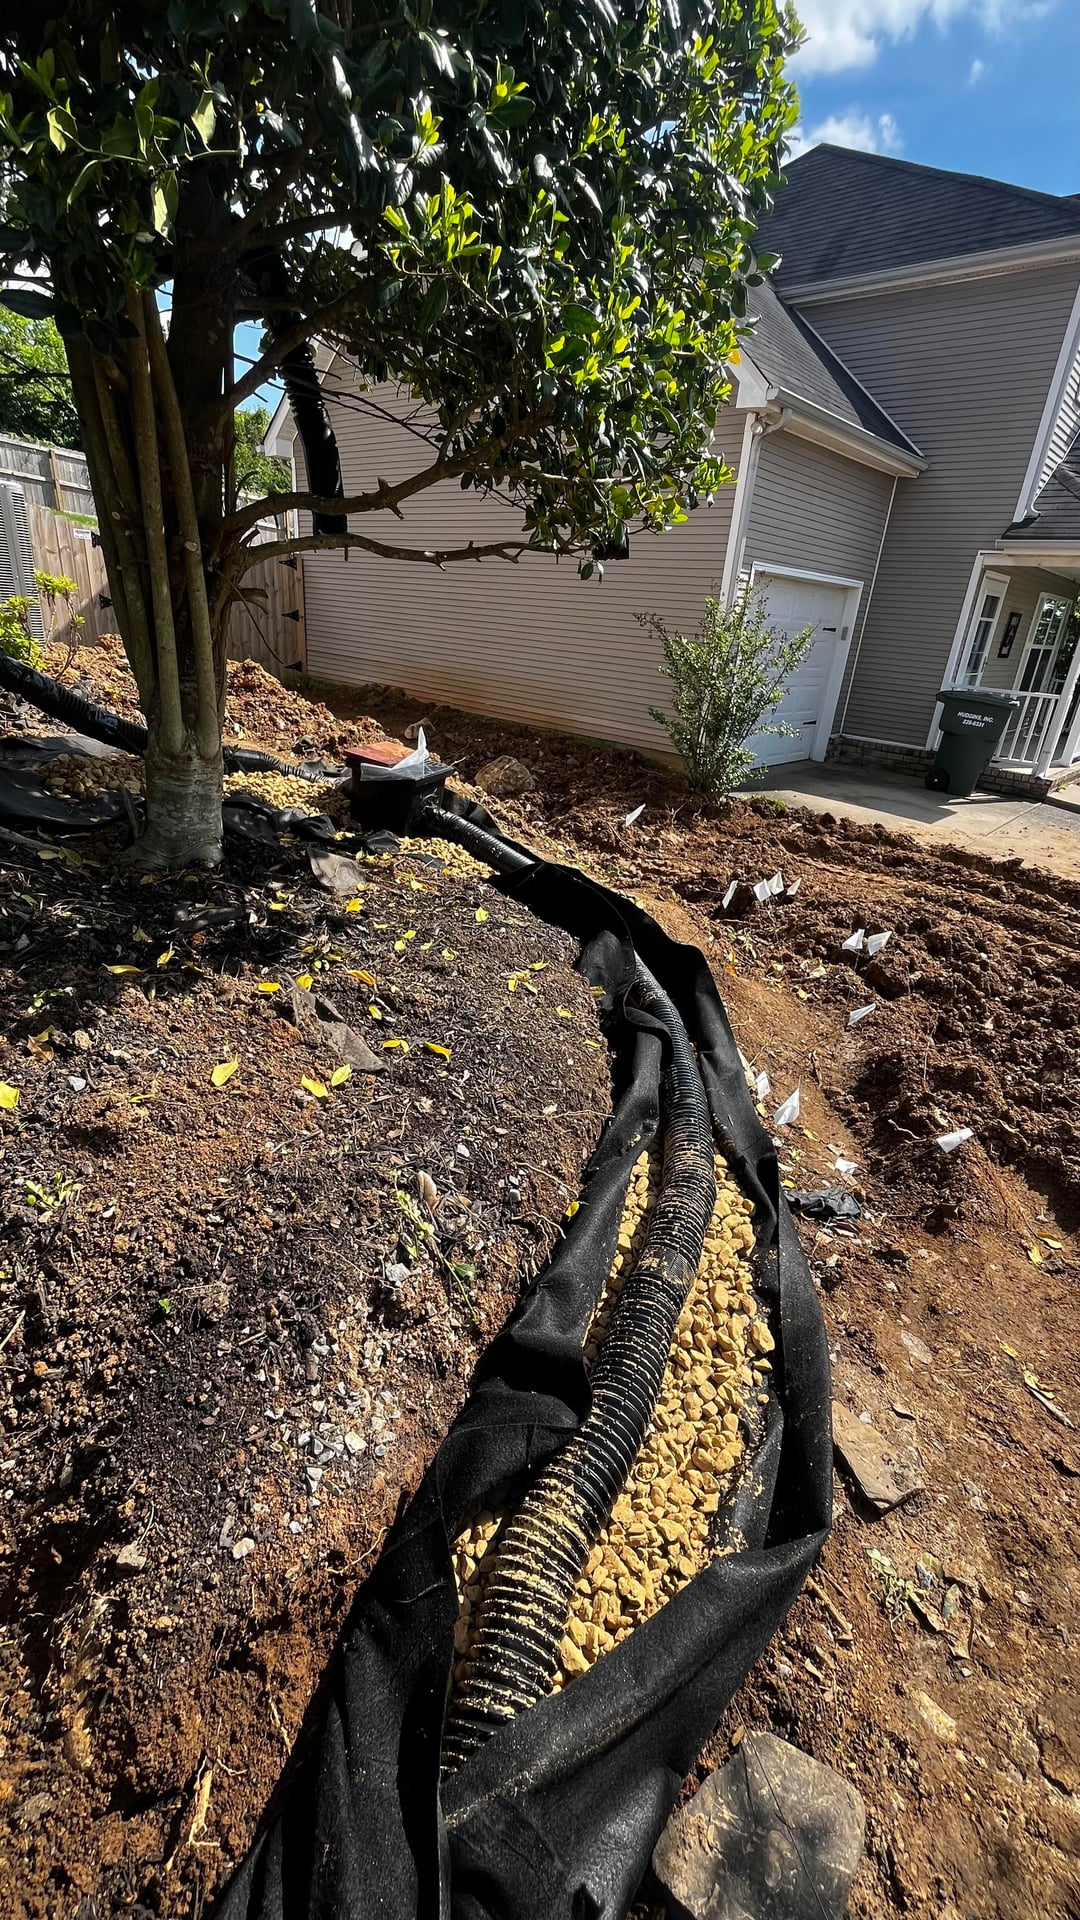
Dig/trench/install a french drain and stormwater retention system
Build a retaining wall along the house
Add good soil / material to enable a healthy lawn & flower bed area behind the retaining wall
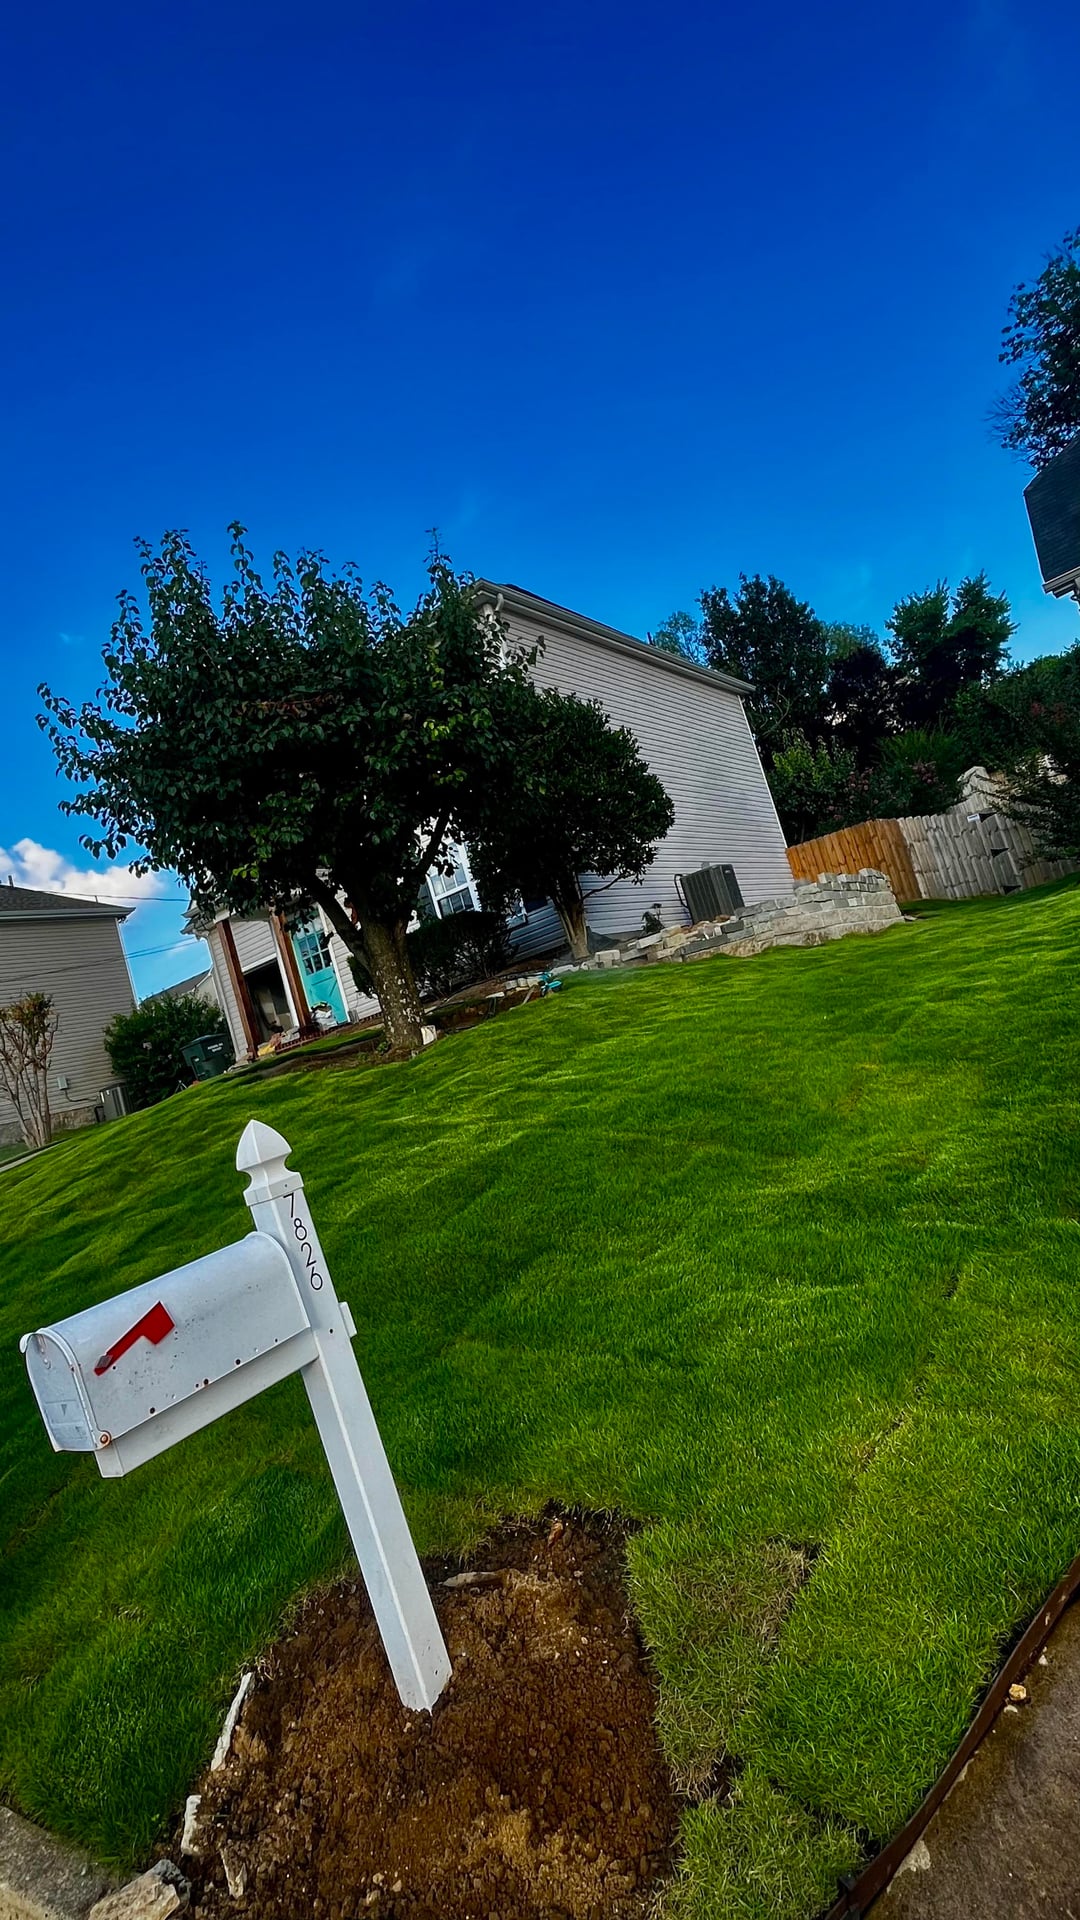
Install new sod
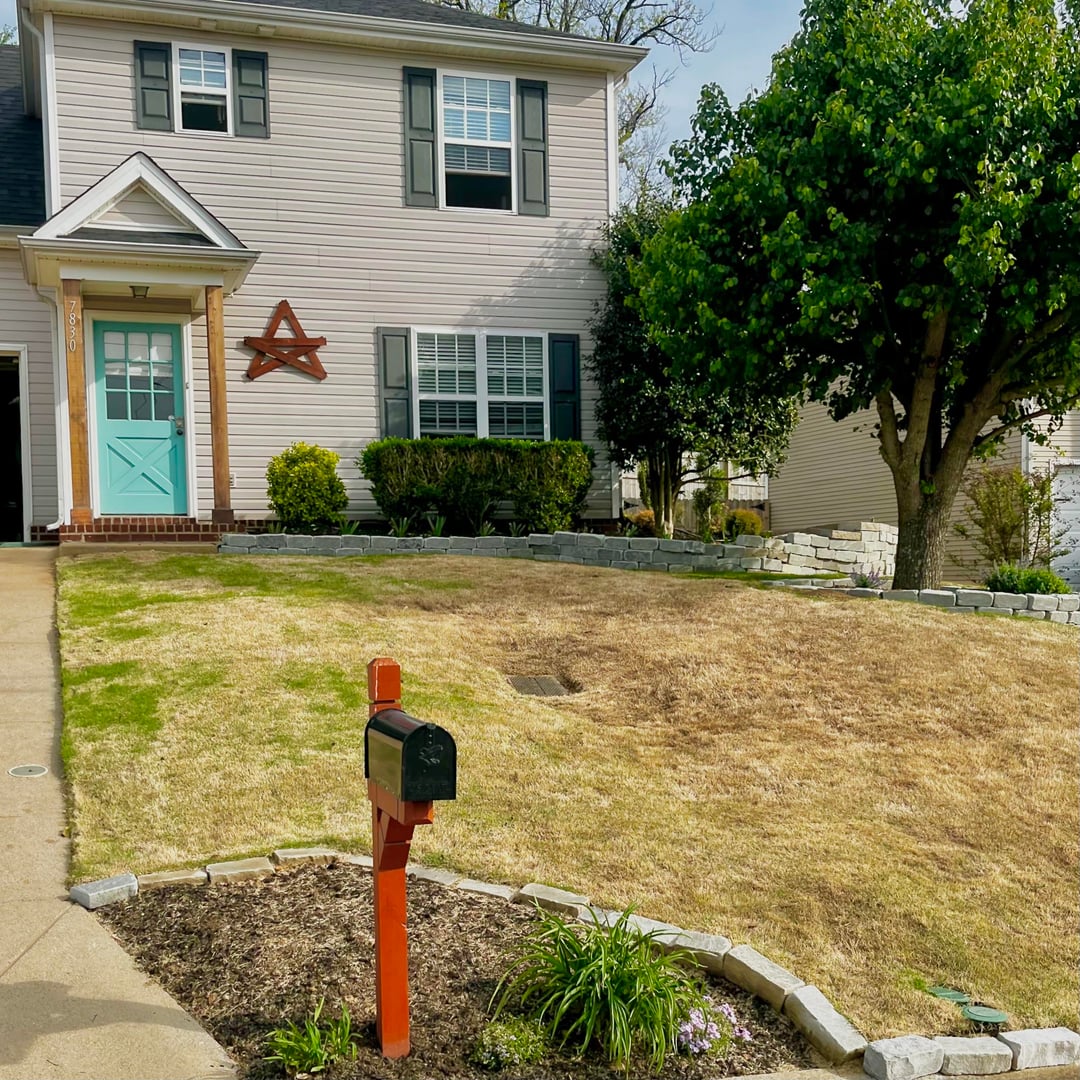
Install a trim for flower beds around a tree and mailbox
Planning
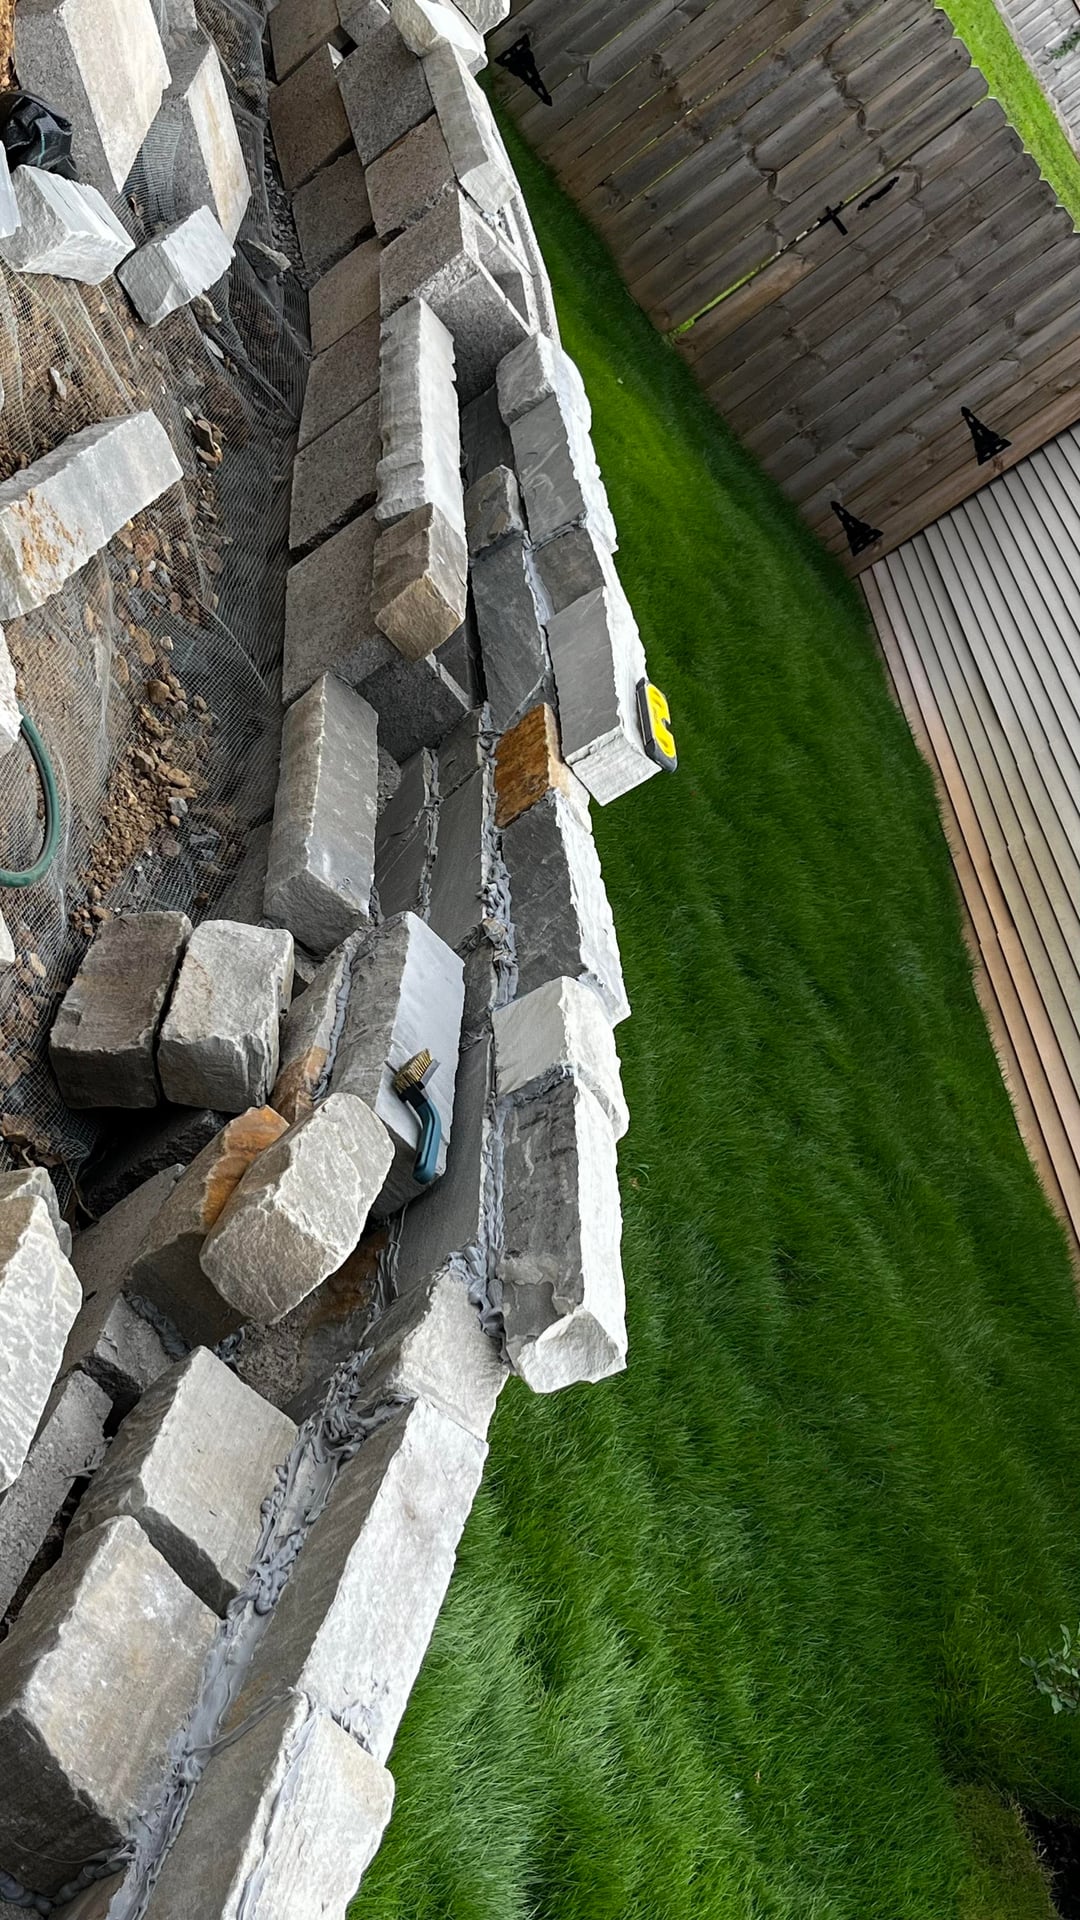
Proposed a plan to the owner who identified their desired sod, stone materials and layout/design for retaining wall. She requested TN blue-gray cobblestones for the stone edge trim, a mix of TN blue-gray cobbles and rubble brick for the appearance of a traditional/old dry stack wall as much as possible and zoyisia sod.
Marked the site with paint to confirm layout / location.
811 marked underground utilities and gave permission to dig.
Plan submitted to HOA/approved.
Budgeted for rentals and materials with time estimates for work; Ordered materials.
Actions & How it Went
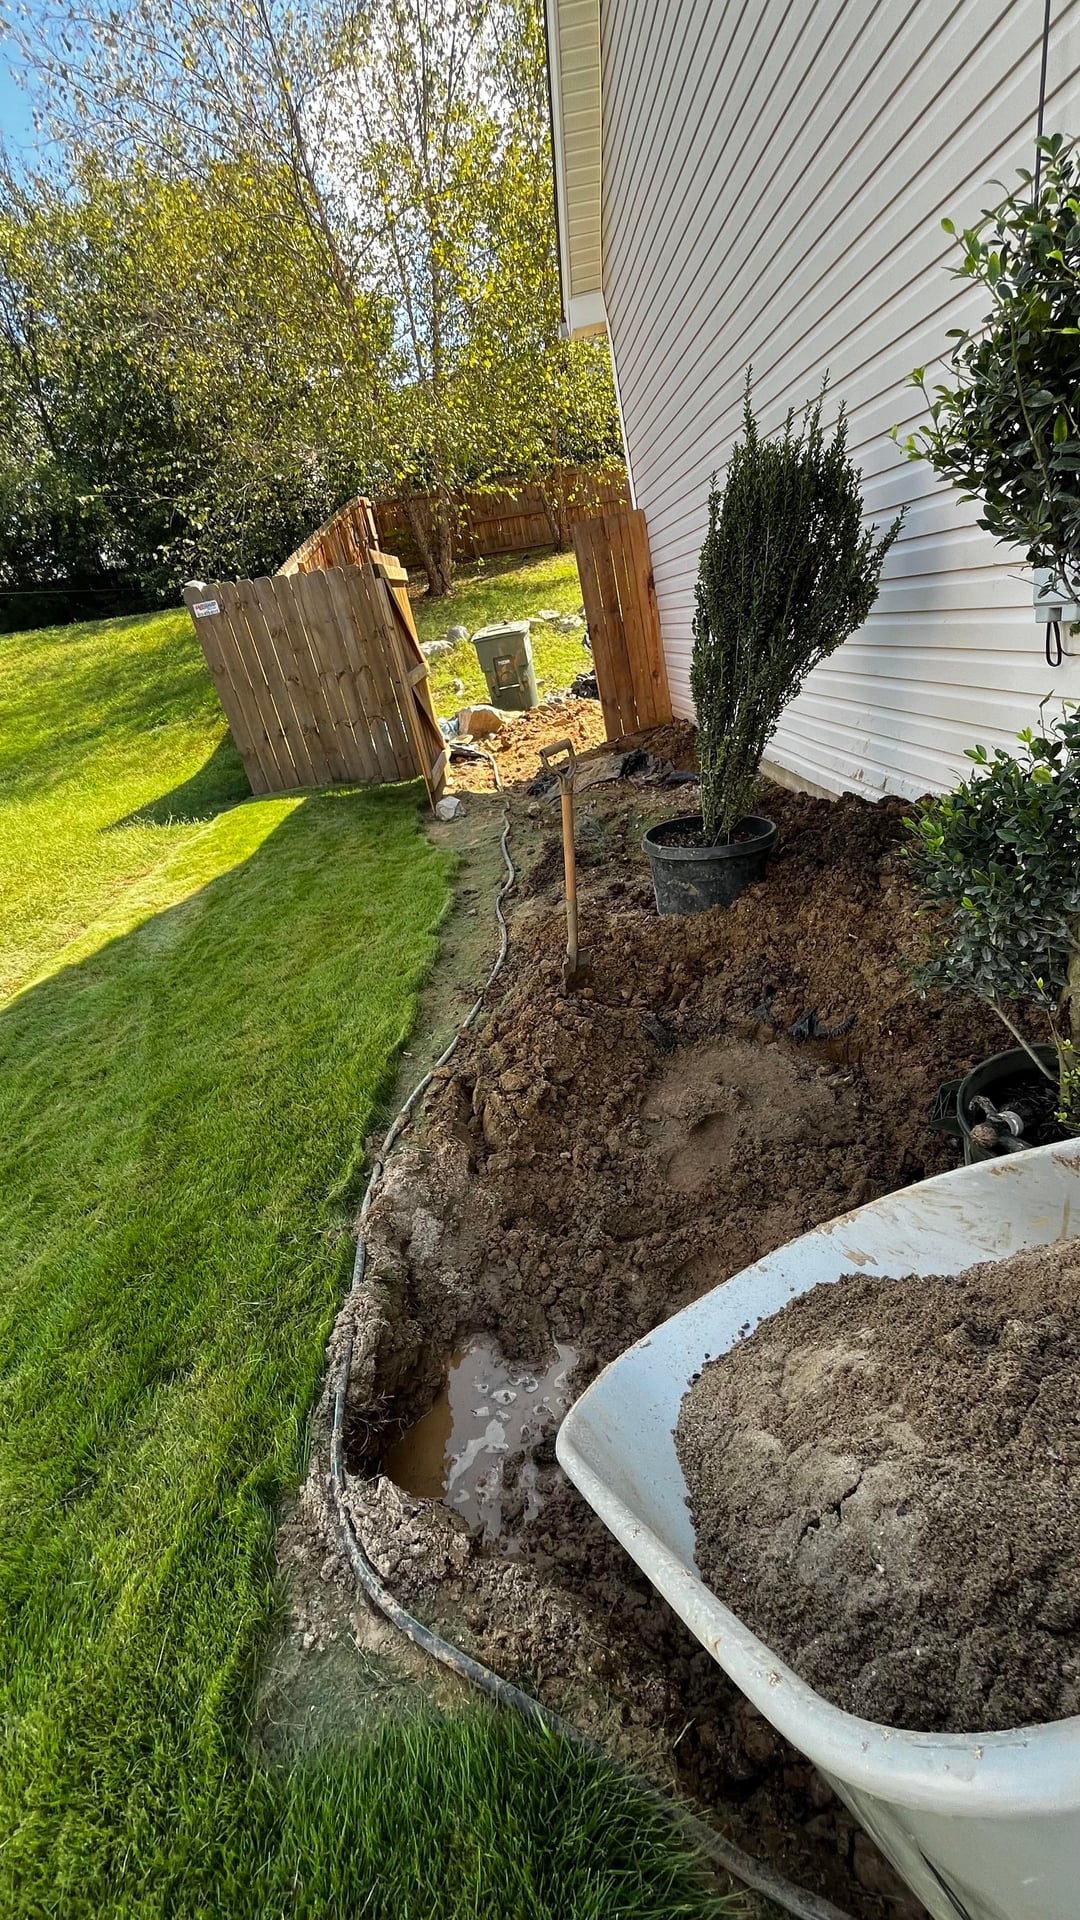
Excavated over 15 tons. The plan was to simply “scrape” the top layer of bad soil/grass, there was a massive volume of trash and construction materials(e.g., bags of concrete, broken concrete blocks, bricks, cans, etc.) — much of it as close to the surface as just 2 inches deep. This instantly eliminated the mystery of why grass or other plants simply would not grow in certain places.
Hit the Water Service Line – Evidently, 811 will only mark the locations of public lines – the water service line (from the box to the house) was not marked — and due to the erosion, was only FOUR inches from the service. I hit the line and lost a week waiting for the repair. Thankfully the repair cost was minimal. Insulated the line and buried it deeper to prevent future freezing.
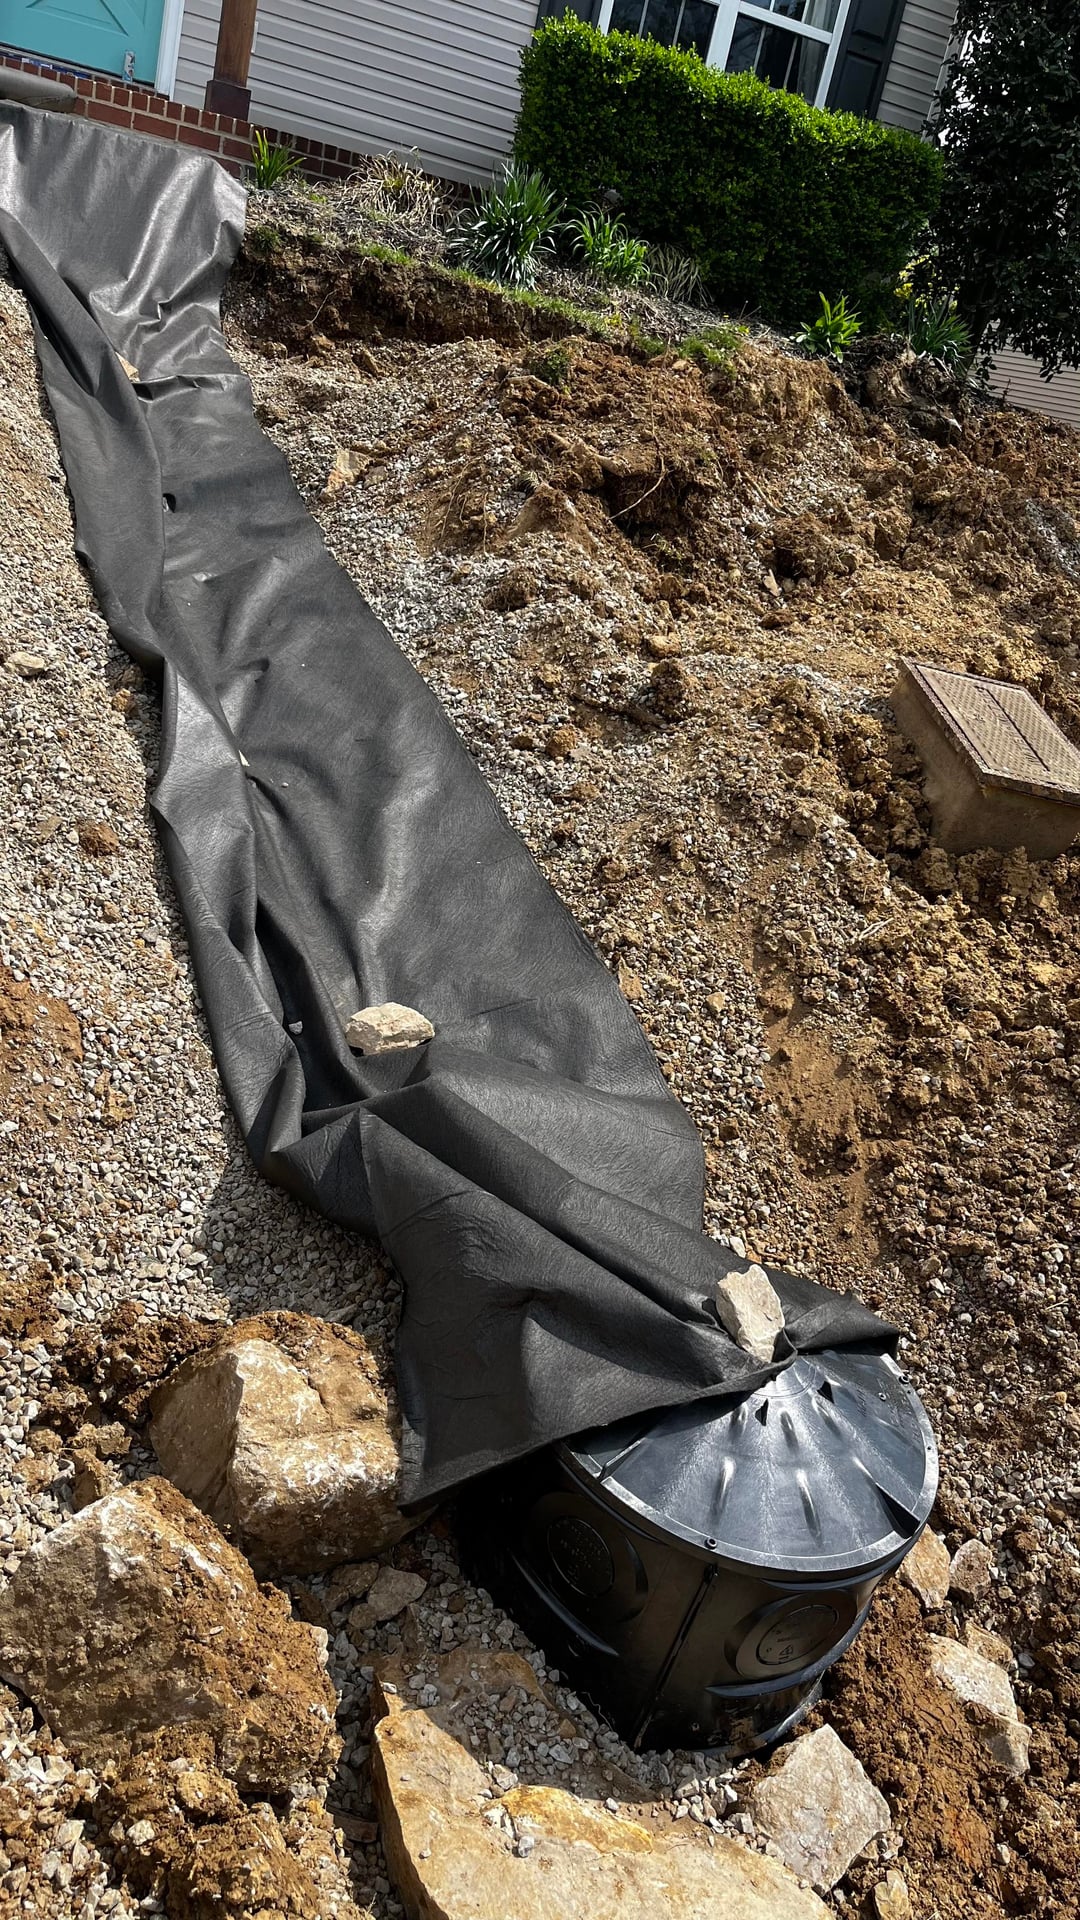
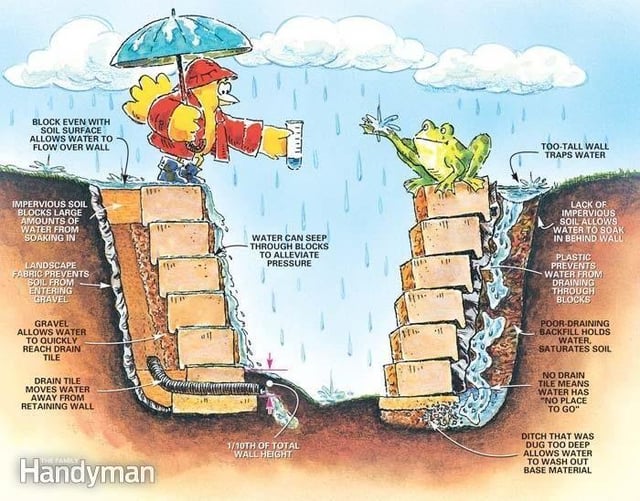
Trenched & Installed French Drain & Stormwater Retention System – Used Non-Woven Geotextile Fabric. River rock. Installed two NDS Flo Well 50 Gallon Stormwater with pop-up emitters and catch basins.
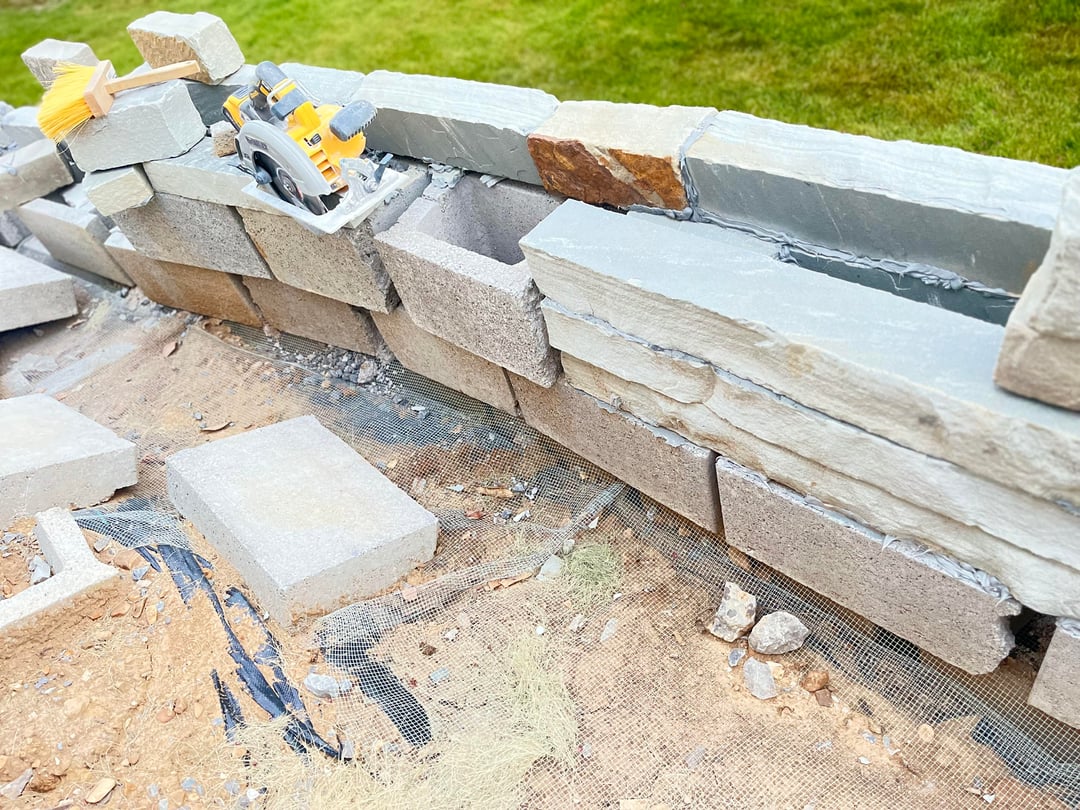
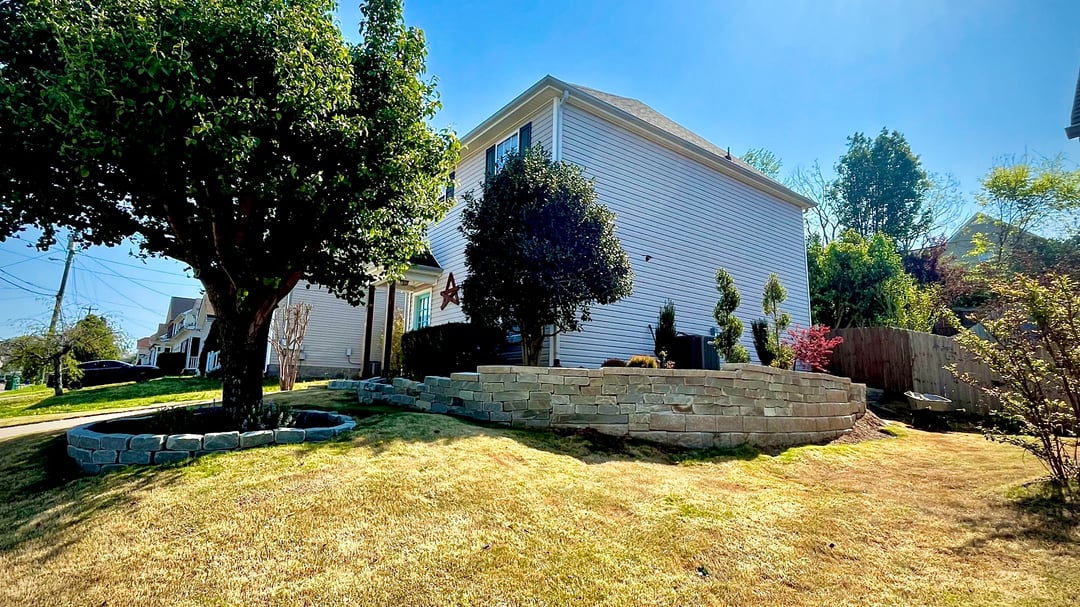
Retaining wall base installed – Belgard Allen Blocks for the base – two courses installed below ground. Allen Blocks were filled with gravel. The French drain also runs from the backyard and back corner gutter downspout along behind the bottom of the retaining wall for proper drainage.
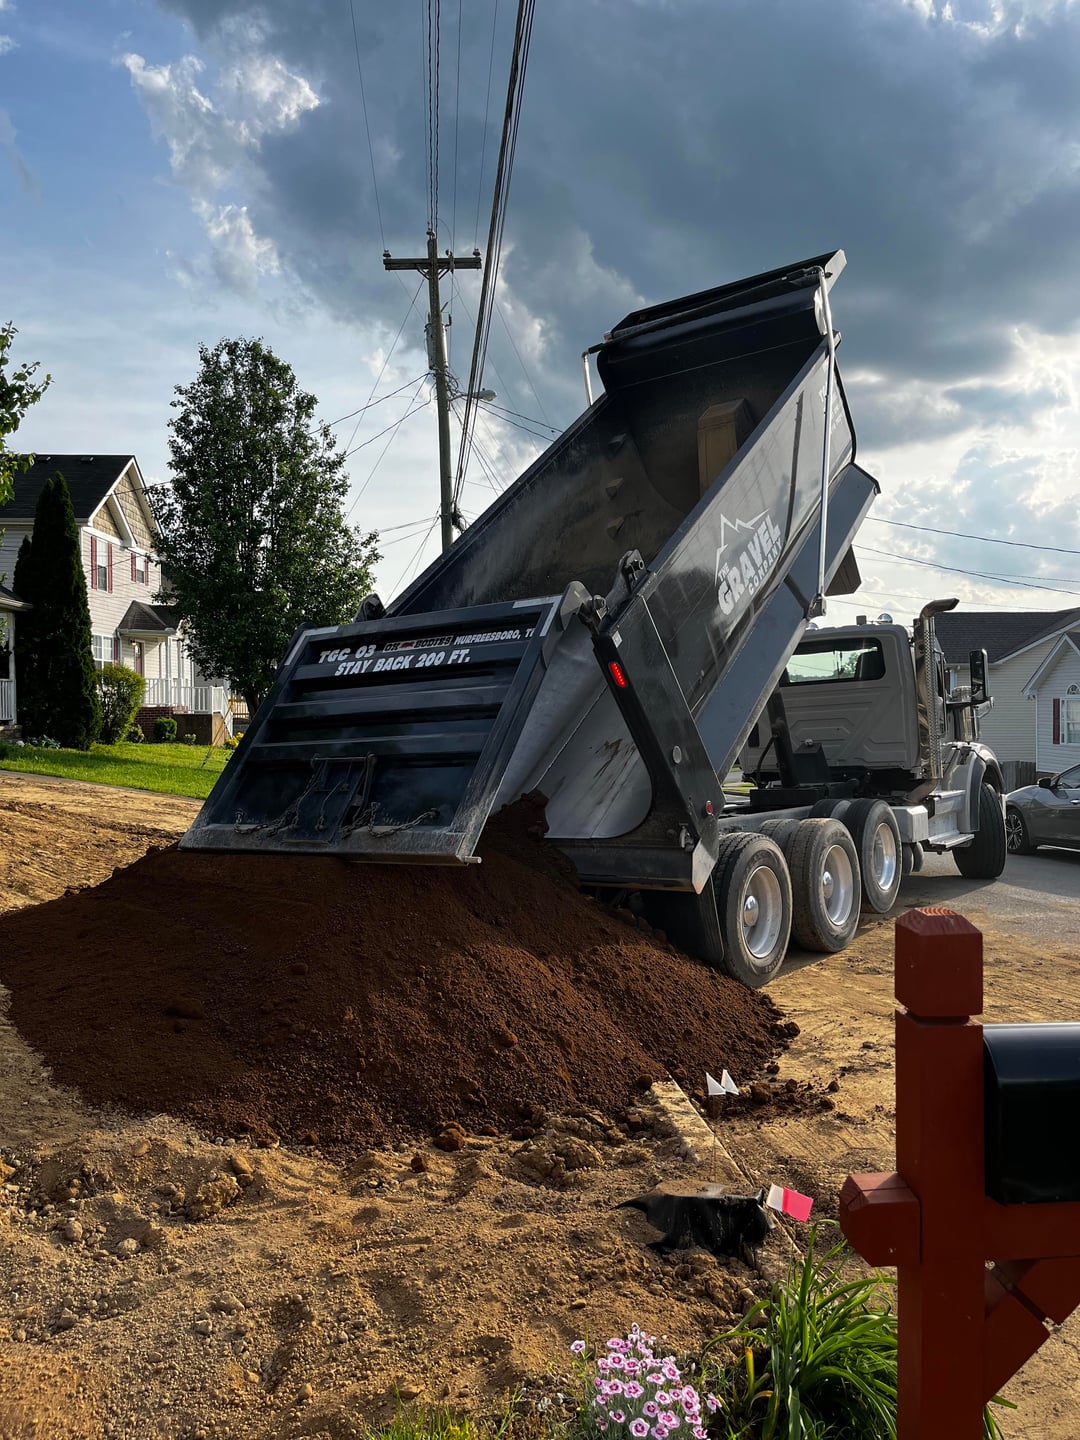
Added over 25 tons of screened top soil, compost, garden & sand mix – Regraded and packed. PH tested adjusted with some fertilizer and applied preemergent.
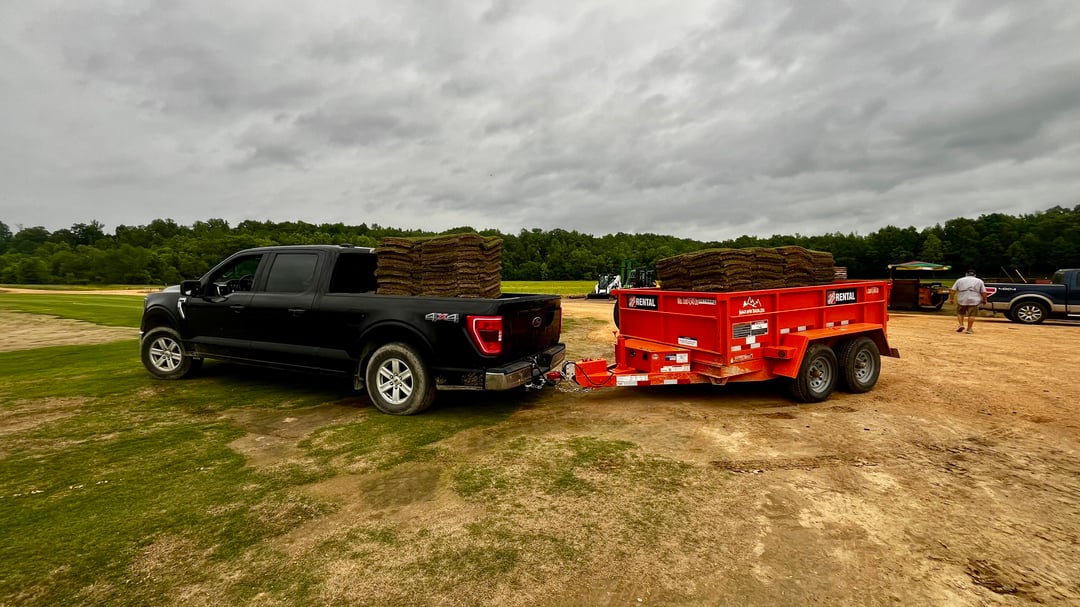
Sod installed – The intention was to complete the retaining wall prior to installing sod – however, the delays from hitting the water line and french drain install took much longer than estimated. The window was closing on availability and timing for spring sod laying – so that happened next.
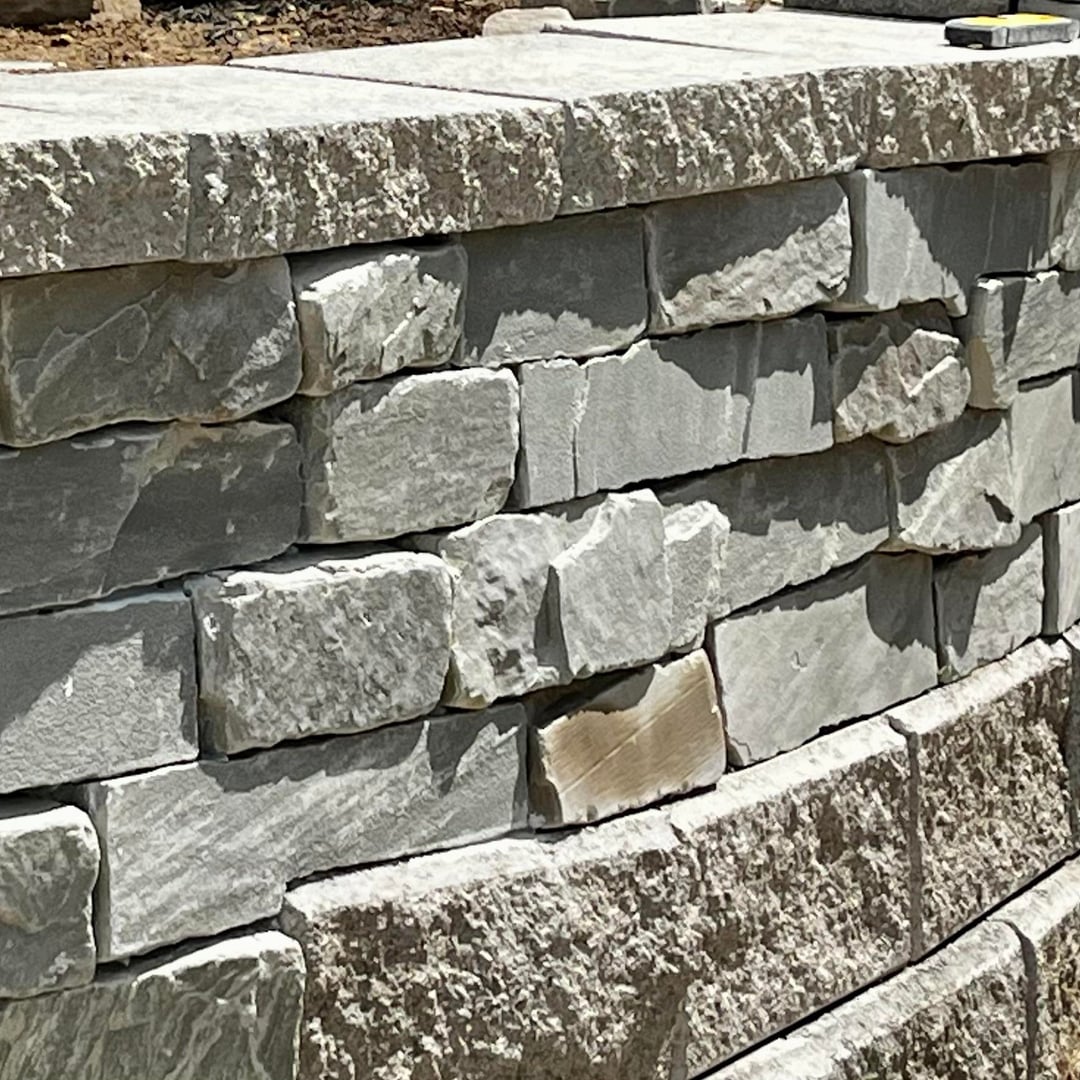
Retaining wall dry stack built – This was significantly more difficult than anticipated. As this was a functioning retaining wall albeit on the small side (designed ~45 inches at its tallest), I installed a dual run of bricks on both the front and back on top of the Allen Blocks. Additionally, there are two layers of geogrid installed going 3 feet to 5 feet back from the wall for additional stability. Utilized PL500 Premium Max or LN-905 construction adhesive. Custom cutting rubble bricks and cobblestone to ensure that the top of the wall is level was a massive time sink and difficult — went through 3 diamond blades on my circular saw. Also began having circulatory and pain issues in my hands from the work / If I were to do it again, I would insist on simply using the Belgard bricks.
Built the cobblestone edge trim along the front of the house connecting to the retaining wall – Laid a level concrete base (8”x6”)
Built the cobblestone edge trim around the tree – this goes 2 courses down and also uses the construction adhesive.
Backfilled sand/ soil / compost behind retaining wall – Entirely behind and along the wall is majority sand for ensuring optimal drainage.
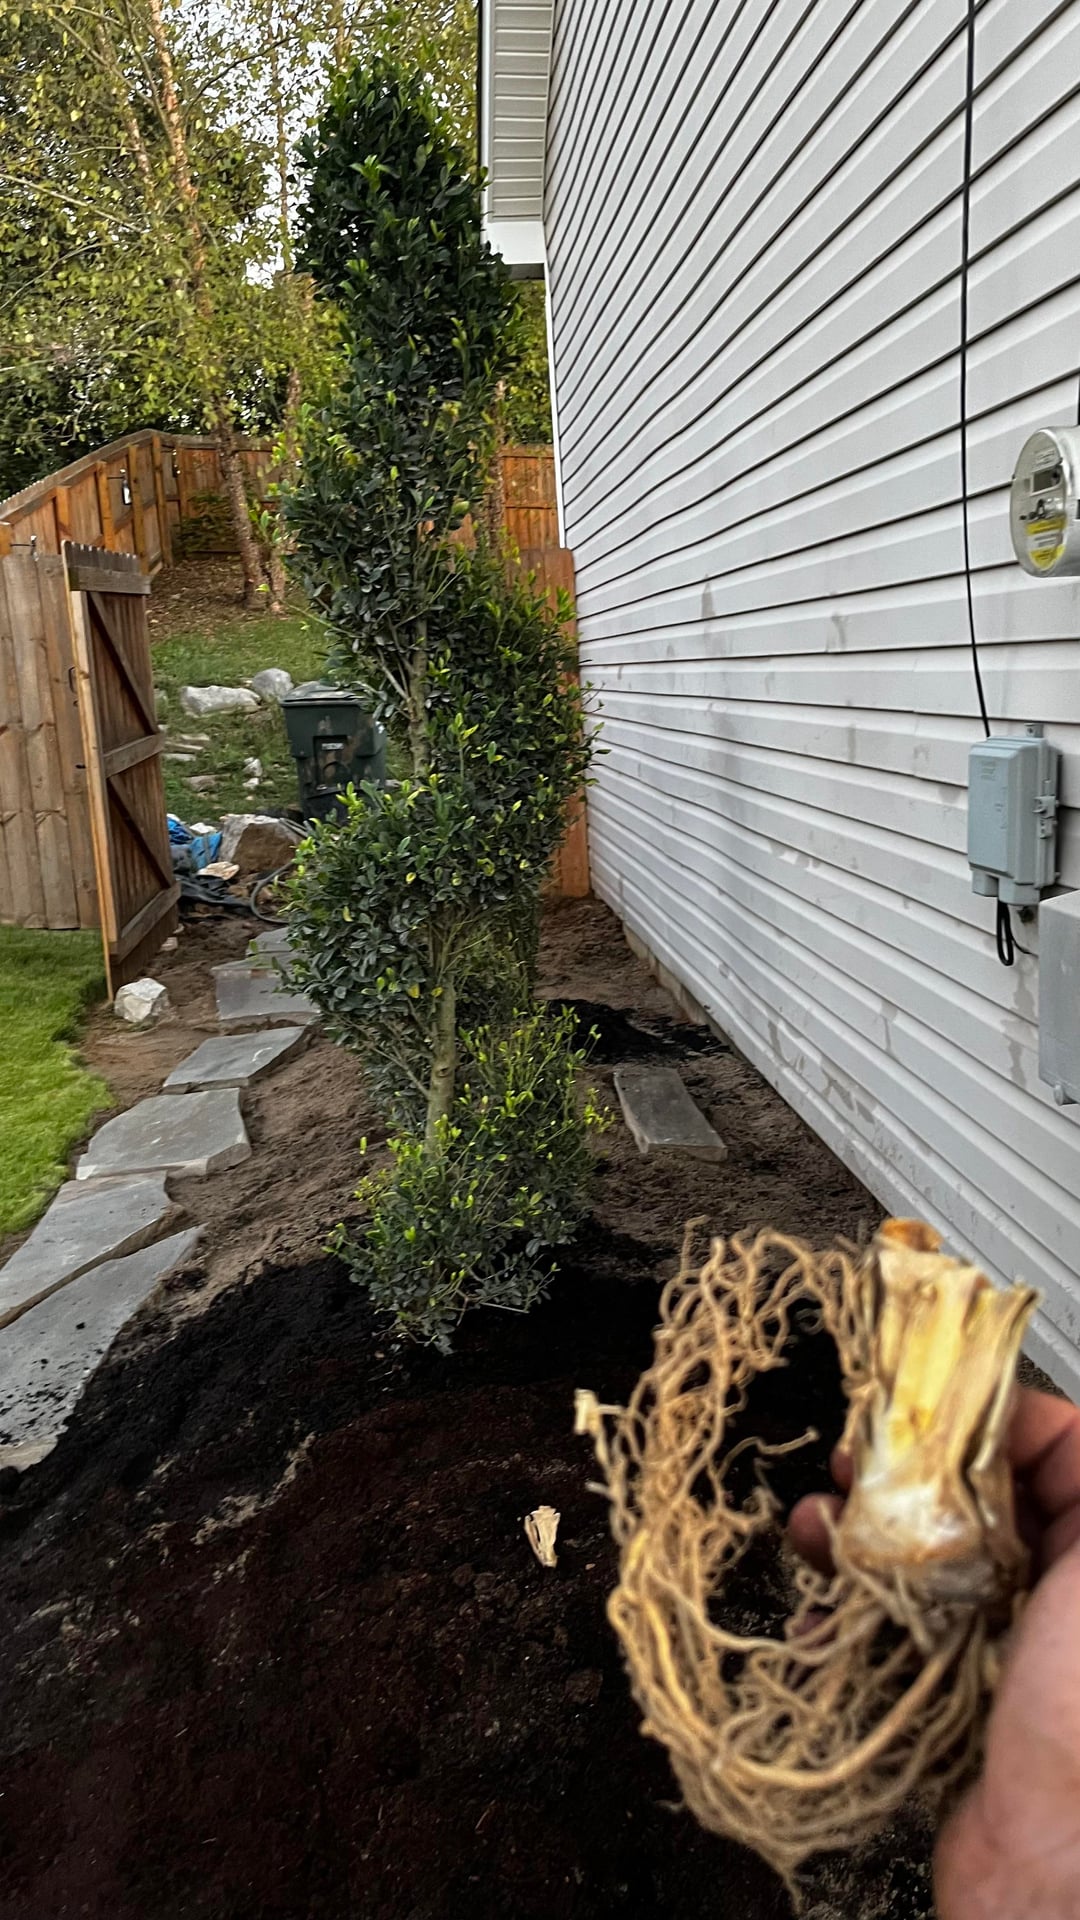
Installed plants / trees – the big items were 3 empire colonnade holly, 3 japanese sky pencil holly and a tamukeyama japanese maple. My warrior lady also ordered many plants herself such as lillies, irises, etc. This was not part of the original plan because she was supposed to have returned from deployment by October/November (i.e., the fall planting season) but her deployment took almost 15 months total instead of the 12 months in the original plans.
Custom-cut Belgard toppers for an even finish to the retaining wall (see above)
Budget Cost: $22,000
Actual Cost: ~$33,000
Biggest Cost Overrun Sources:
Soil / Fill Materials – >$5,000 more than budget
Trees / plants –> $2,800 – not planned/budgeted
Flagstones for path → $1,600 – not planned/budgeted
Construction Adhesive – >$500 more than budget
Gloves – $300 – I went through so many pairs of gloves – impossible to find good ones when working with stones – eventually just gave up.
Conclusion
I estimated this would be a summer project that might take me 3 months at most.
This was very wrong – it was not completed until December with a few small finishes that couldn’t be completed until a few weeks ago.
I was not aware how much maintenance Zoyisia required — I let the lawn get too tall a couple times which created much more work in dethatching and clipping removal. Herbicide treatment to eliminate sedge was also not on my list.
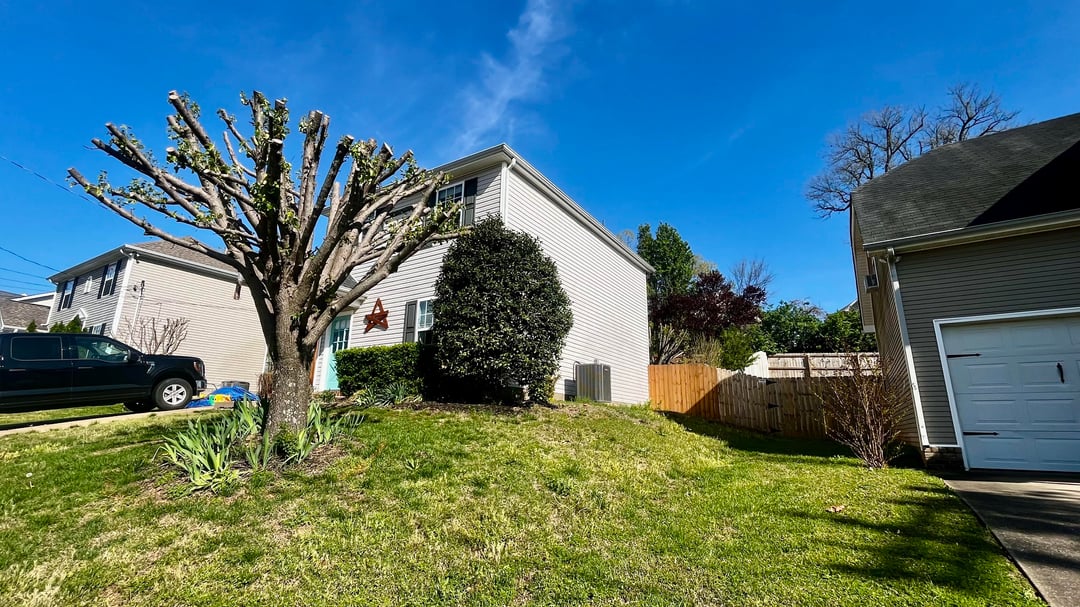
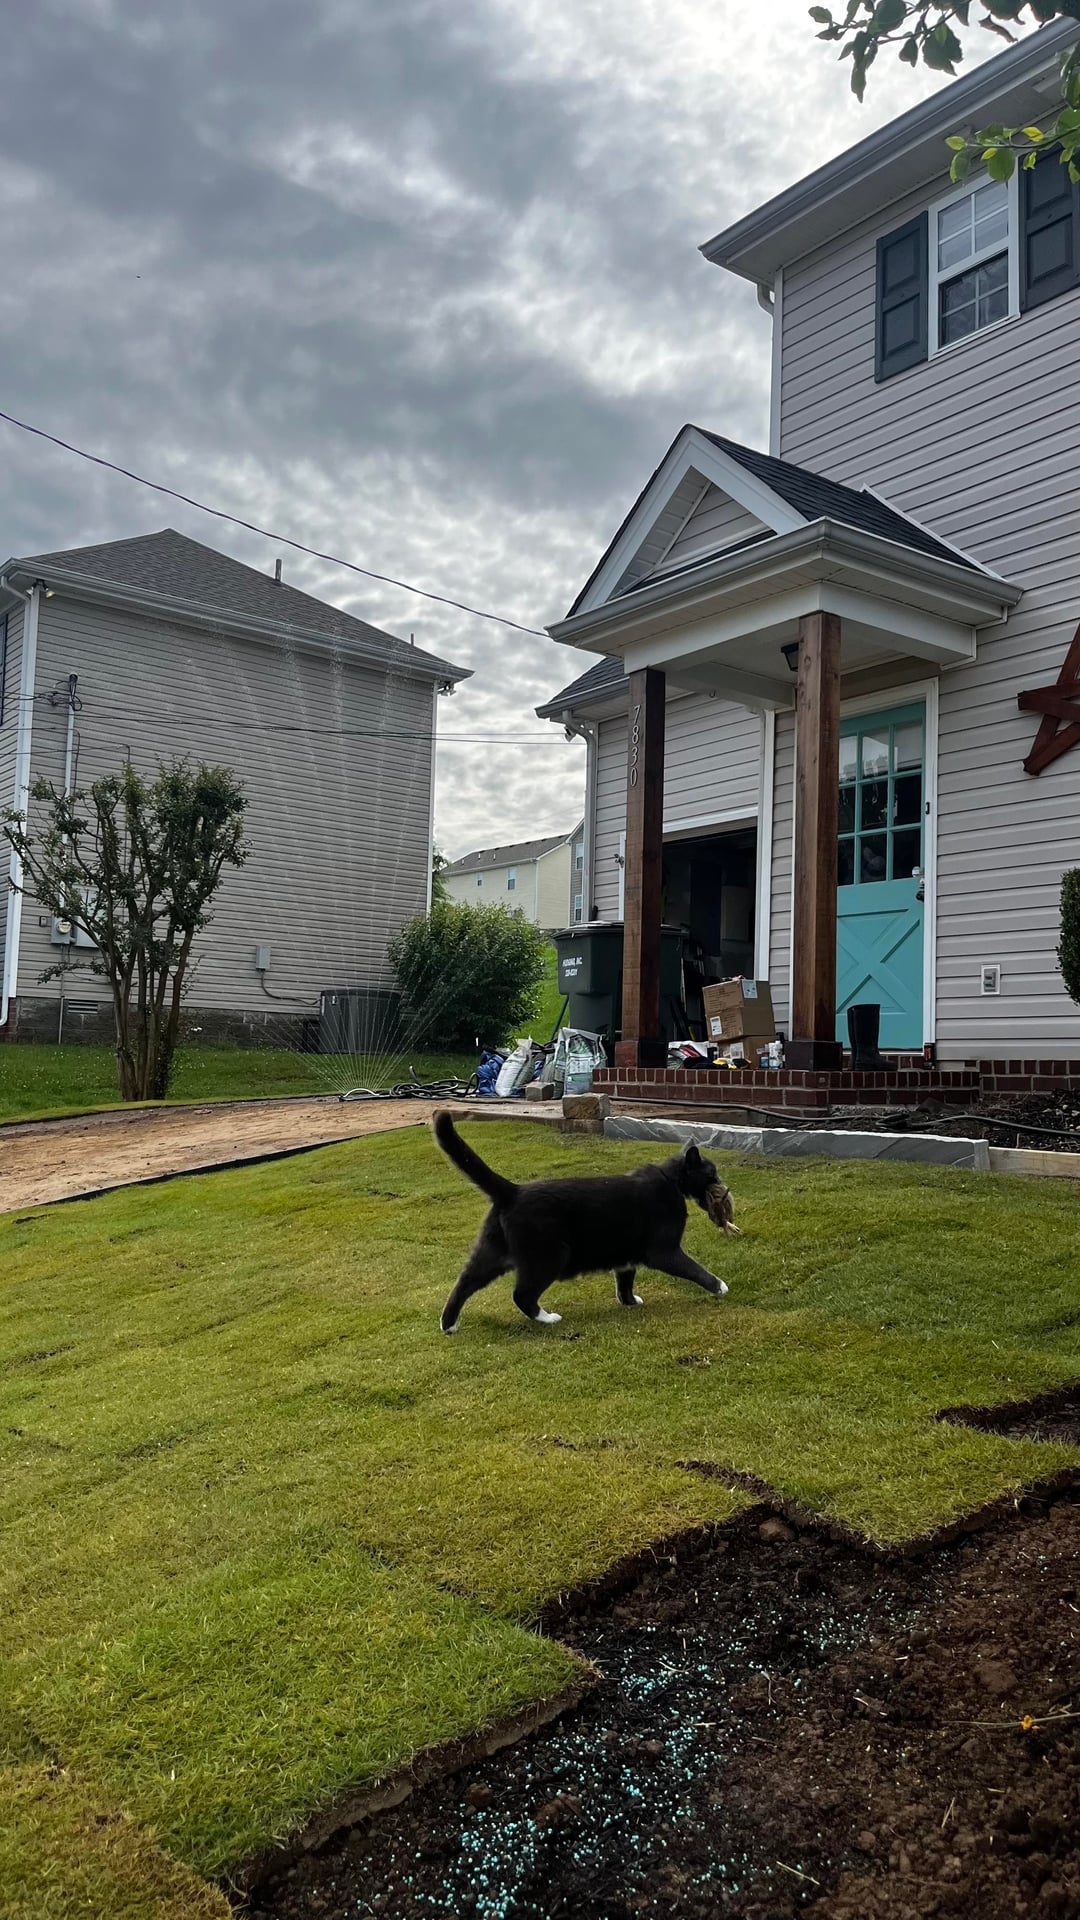
In the end, my love returned home safe from her Army deployment and she’s happy with her new lawn and features. I’m grateful for the opportunity to make her life better and demonstrate my love in concrete terms. 🙂
Question – Any guesses as to what this would cost if it were done by a professional?
Comments, questions and feedback / advice is most welcome.
Although I worked several gigs when I was young landscaping — and have done several DIY sodding and hardscape projects — this was by far the biggest and most challenging.
I have a much deeper appreciation and admiration for all the pros out there. Hats off to everyone who does this on the daily
tpatt83
Looks amazing and I’ll steer clear of the cat
Mitcheson555
What a waste of money
ChipmunkLoud4916
Cat
Blue_Collar_Stiff
Very nice except for the bunny.
Tll6
Maybe keep your cat inside so it isn’t killing native wildlife? Cats kill millions of birds and mammals every year and are responsible for the extinction of several species of birds
Sorryisawthat
The cat!!!!!! 😂😂😂😂🥷
inertiapixel
water that sod
DoubleCrowne
looks pretty good as far as DIYs go, but you need to water that sod or else you’re gonna watch a lot of time and money go down the drain real quick


10 Comments
My girlfriend was deployed for the US Army over the last year – a difficult time for her — so I wanted her to come home to the lawn of her dreams.
Here’s a summary of the work, process and pics for DIY education and pro feedback.
Pre-Work SIte Review
Front lawn consisted mostly of weeds and a high density crabgrass.
Very bad soil PH (~2 to 3) with heavy deposits of rock, stone and clay made developing a lawn from seeding impossible.
Home inspection at purchase identified downspout and storm drainage as a need to prevent further erosion to prevent problems with the slab foundation. That was over 10 years ago and significant erosion was evident.
The grade was extremely steep immediately against the house 15 to 25%. In addition to mitigating future erosion, there was also a need to add material along the house to replace what’s been lost over the years.
Project Objectives
Scrape and remove the top layer of bad soil/grass
Dig/trench/install a french drain and stormwater retention system
Build a retaining wall along the house
Add good soil / material to enable a healthy lawn & flower bed area behind the retaining wall
Install new sod
Install a trim for flower beds around a tree and mailbox
Planning
Proposed a plan to the owner who identified their desired sod, stone materials and layout/design for retaining wall. She requested TN blue-gray cobblestones for the stone edge trim, a mix of TN blue-gray cobbles and rubble brick for the appearance of a traditional/old dry stack wall as much as possible and zoyisia sod.
Marked the site with paint to confirm layout / location.
811 marked underground utilities and gave permission to dig.
Plan submitted to HOA/approved.
Budgeted for rentals and materials with time estimates for work; Ordered materials.
Actions & How it Went
Excavated over 15 tons. The plan was to simply “scrape” the top layer of bad soil/grass, there was a massive volume of trash and construction materials(e.g., bags of concrete, broken concrete blocks, bricks, cans, etc.) — much of it as close to the surface as just 2 inches deep. This instantly eliminated the mystery of why grass or other plants simply would not grow in certain places.
Hit the Water Service Line – Evidently, 811 will only mark the locations of public lines – the water service line (from the box to the house) was not marked — and due to the erosion, was only FOUR inches from the service. I hit the line and lost a week waiting for the repair. Thankfully the repair cost was minimal. Insulated the line and buried it deeper to prevent future freezing.
Trenched & Installed French Drain & Stormwater Retention System – Used Non-Woven Geotextile Fabric. River rock. Installed two NDS Flo Well 50 Gallon Stormwater with pop-up emitters and catch basins.
Retaining wall base installed – Belgard Allen Blocks for the base – two courses installed below ground. Allen Blocks were filled with gravel. The French drain also runs from the backyard and back corner gutter downspout along behind the bottom of the retaining wall for proper drainage.
Added over 25 tons of screened top soil, compost, garden & sand mix – Regraded and packed. PH tested adjusted with some fertilizer and applied preemergent.
Sod installed – The intention was to complete the retaining wall prior to installing sod – however, the delays from hitting the water line and french drain install took much longer than estimated. The window was closing on availability and timing for spring sod laying – so that happened next.
Retaining wall dry stack built – This was significantly more difficult than anticipated. As this was a functioning retaining wall albeit on the small side (designed ~45 inches at its tallest), I installed a dual run of bricks on both the front and back on top of the Allen Blocks. Additionally, there are two layers of geogrid installed going 3 feet to 5 feet back from the wall for additional stability. Utilized PL500 Premium Max or LN-905 construction adhesive. Custom cutting rubble bricks and cobblestone to ensure that the top of the wall is level was a massive time sink and difficult — went through 3 diamond blades on my circular saw. Also began having circulatory and pain issues in my hands from the work / If I were to do it again, I would insist on simply using the Belgard bricks.
Built the cobblestone edge trim along the front of the house connecting to the retaining wall – Laid a level concrete base (8”x6”)
Built the cobblestone edge trim around the tree – this goes 2 courses down and also uses the construction adhesive.
Backfilled sand/ soil / compost behind retaining wall – Entirely behind and along the wall is majority sand for ensuring optimal drainage.
Installed plants / trees – the big items were 3 empire colonnade holly, 3 japanese sky pencil holly and a tamukeyama japanese maple. My warrior lady also ordered many plants herself such as lillies, irises, etc. This was not part of the original plan because she was supposed to have returned from deployment by October/November (i.e., the fall planting season) but her deployment took almost 15 months total instead of the 12 months in the original plans.
Custom-cut Belgard toppers for an even finish to the retaining wall (see above)
Budget Cost: $22,000
Actual Cost: ~$33,000
Biggest Cost Overrun Sources:
Soil / Fill Materials – >$5,000 more than budget
Trees / plants –> $2,800 – not planned/budgeted
Flagstones for path → $1,600 – not planned/budgeted
Construction Adhesive – >$500 more than budget
Gloves – $300 – I went through so many pairs of gloves – impossible to find good ones when working with stones – eventually just gave up.
Conclusion
I estimated this would be a summer project that might take me 3 months at most.
This was very wrong – it was not completed until December with a few small finishes that couldn’t be completed until a few weeks ago.
I was not aware how much maintenance Zoyisia required — I let the lawn get too tall a couple times which created much more work in dethatching and clipping removal. Herbicide treatment to eliminate sedge was also not on my list.
In the end, my love returned home safe from her Army deployment and she’s happy with her new lawn and features. I’m grateful for the opportunity to make her life better and demonstrate my love in concrete terms. 🙂
Question – Any guesses as to what this would cost if it were done by a professional?
Comments, questions and feedback / advice is most welcome.
Although I worked several gigs when I was young landscaping — and have done several DIY sodding and hardscape projects — this was by far the biggest and most challenging.
I have a much deeper appreciation and admiration for all the pros out there. Hats off to everyone who does this on the daily
Looks amazing and I’ll steer clear of the cat
What a waste of money
Cat
Very nice except for the bunny.
Maybe keep your cat inside so it isn’t killing native wildlife? Cats kill millions of birds and mammals every year and are responsible for the extinction of several species of birds
The cat!!!!!! 😂😂😂😂🥷
water that sod
looks pretty good as far as DIYs go, but you need to water that sod or else you’re gonna watch a lot of time and money go down the drain real quick
