


Hi everyone, I’d like to share a special vivarium/paluradium project I’ve been working on for a while (about two years now). So I’d like to tell you about it and share what I’ve found.
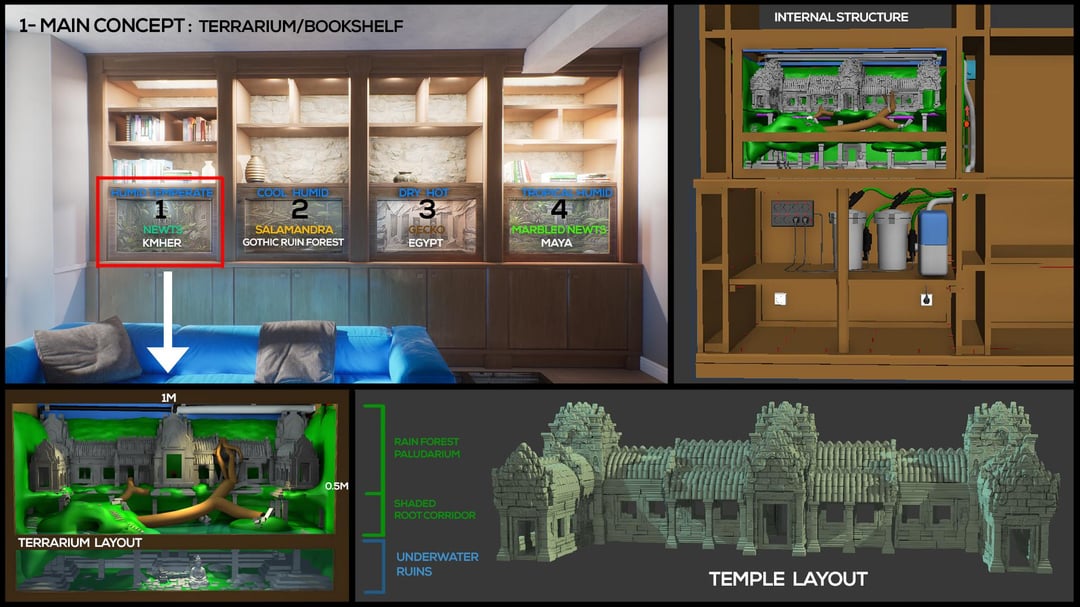
When we were renovating our living room (very old house), we ended up with a large, empty wall. I immediately pictured a large castle bookcase (4.5m wide), but I didn’t have any more space for terrariums, so I decided to combine those: having the terrariums in the bookshelf and the technical equipment at the bottom, and the books above.
Current step :The 1st temple of the first terrarium is 98% done, and for the bookshelf i only have done the main base and electrical part of the botom.
Concept for Terra-Bookshelf : I had chosen to have 4 terrariums ( ≈95cm x50 x 50) because, as the wall is 4.5 metres wide and I want to use the structure between the terrariums for the technical pipework (pump, lighting, etc, wide enough to fit my hand through), because with 3, the shelves would have been too wide and there would have been too much weight (of books) above the terrariums, and with 5 they were really too small for what I have in mind, and divising by 5 results in odd irrational dimensions…
My goal/methode : Naturally, seeing thoses images, you’re bound to ask me how/why/u ok ? because I think my approach is rather unusual. I have this perspective because I’ve been working in the 3D animation industry for over 15 years (3D, video games, 3D scanning, CGI..), so I have a well-developed artistic eye for spatial composition, much like the old master paintings but with depth.
I'm also a Warhammer miniatures painter, So I know that the sense of scale is absolutely crucial if you want to create a sense of realism in the model.
I have always been passionate about reptiles and amphibians, however, now that I have the tools, motivation and time to do so, I want to try to bring something never seen before to this fiel, as photo-realistic as possible in every aspect: shape, assembly, colour, moss, and of course, bioactive. But no plastic and no paint. Everything must look real, like a scene cut out of nature, but in miniature. I want every macro to look as though it was taken on the place.
Concept for Terrariums : They will featuring four different historical era: Khmer (orange newts, Gothic (Salamandra), Egyptian (Fat tailed gecko), and Mayan (Green newts) (for this room 😵💫now ) and i want to try to make them as detailed and realistic as possible, because why not ?
Why ? : I’ve looked at loads of professional terrariums and paludariums, of all styles, but hardly any of them have made me think, “OK, this one is truly flawless from an artistic point of view”; The attempts at temple designs I see are often slapdash in my opinion, or have a look that’s either plastic-looking or DIY, In short, we’re a long way from the realism of the real thing, or the precision and epicness of dioramas. I’ve never seen a terrarium that really captures that
Often, even when the craftsmanship is top-notch (like Asian aquascaping wich have a crazy art vision), often find them cluttered, crammed with plants everywhere (though very beautiful), just too much – nature doesn’t do that. In nature, chaos is iterative, paradoxically more structured; certain plant species are found in specific locations (shade, humidity, soil) even within a square metre. It’s chaotic, but it makes sense,
1st Temple, the hard one: So I decided to start with the most complex of the four, the Khmer temple.
It’s particularly complex because it has to meet many requirements at once:
– The temple is large and heavy (90cm,10Kg+).
– It must be made of cement or something similar to really look like old stone
– I want real moss that gives the impression of an old, damp temple that’s partially crumbling.
– is two-thirds of the way up in the air, between two layers of collapsed area.
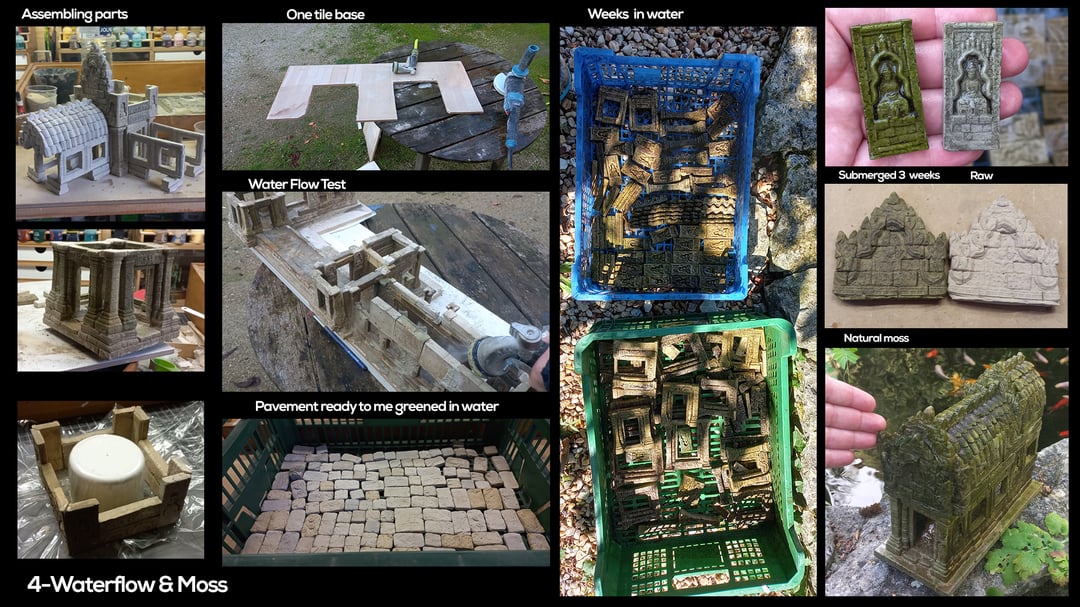
– The water flows out through the two side doors (so the base must be flat, with a slight slope), and must be completely watertight elsewhere on the lower section ans without causing any splashing.
– The roofs must be removable in case of problems.
– None of the supporting pillars must be visible.
– No systems must be visible (in/out pump, bubbler, CO₂, fog) except for the top section, as I cannot really replicate the sky, even if I can make the lights more discreet, only eye-candy
– The cabinet must be moisture-proof (4 terrariums is a lot) and ventilated
– I dream of a “light filtering through the leaves” effect with patches of light.
– I’m sure I’m forgetting other key points…
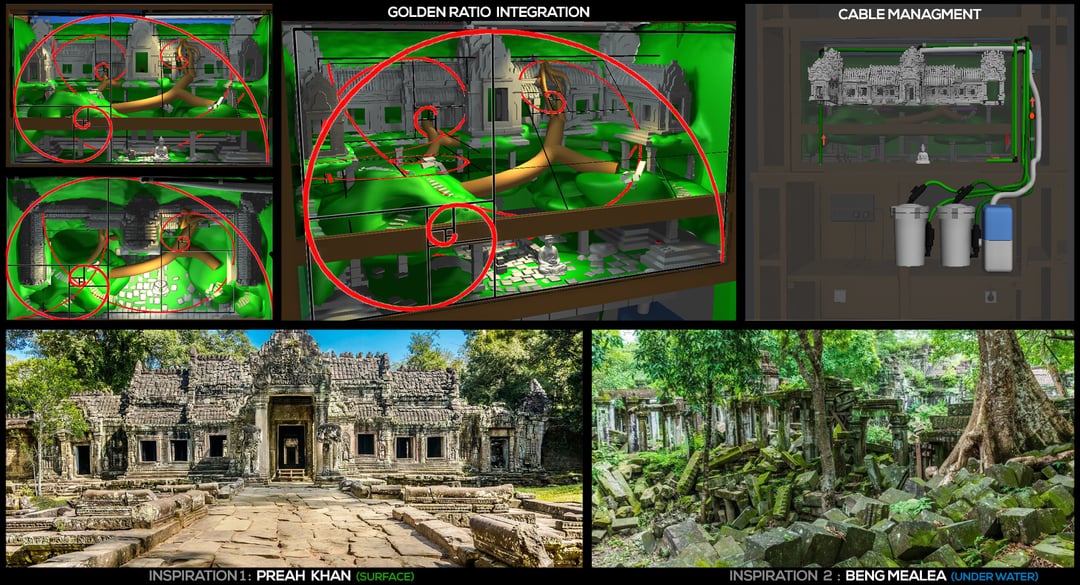
For the temple itself : I studied hundreds of visitors’ photos of the actual temple to understand how the real stones on the real buildings had been designed and assembled.
Clearly, the Khmer builders were familiar with the golden ratio, as I found this ratio appearing almost everywhere (the size of the doors / pediments, the main height / length of the corridors), so I incorporated the golden ratio into the entire structure, as well as its layout, in multiple plan/axis. I have several pieces that are exactly the same length, or that follow the golden ratio, without me having done so on purpose – I just used their dimensions.
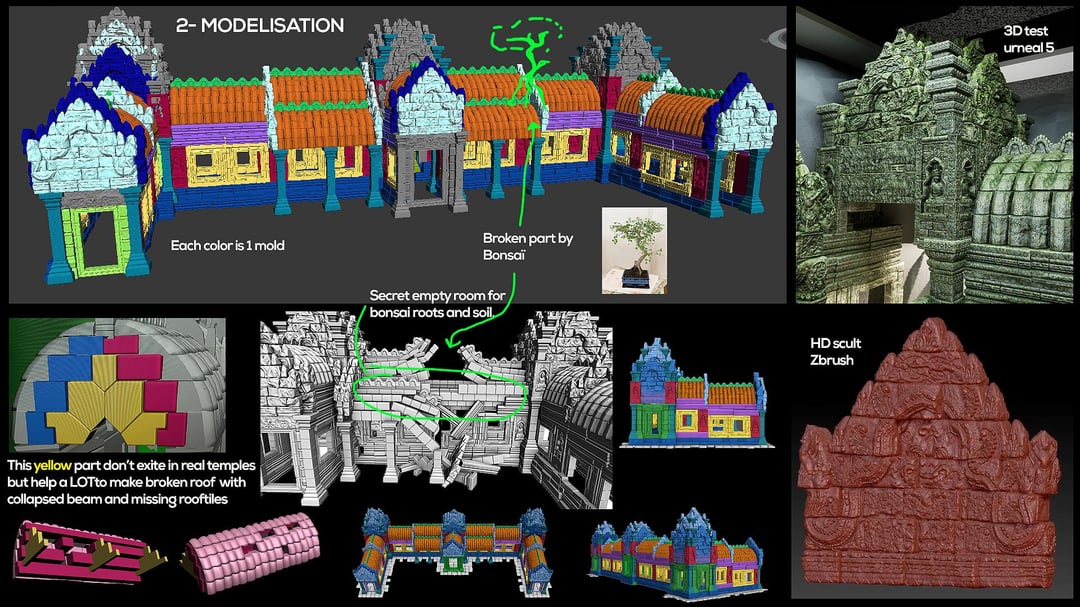
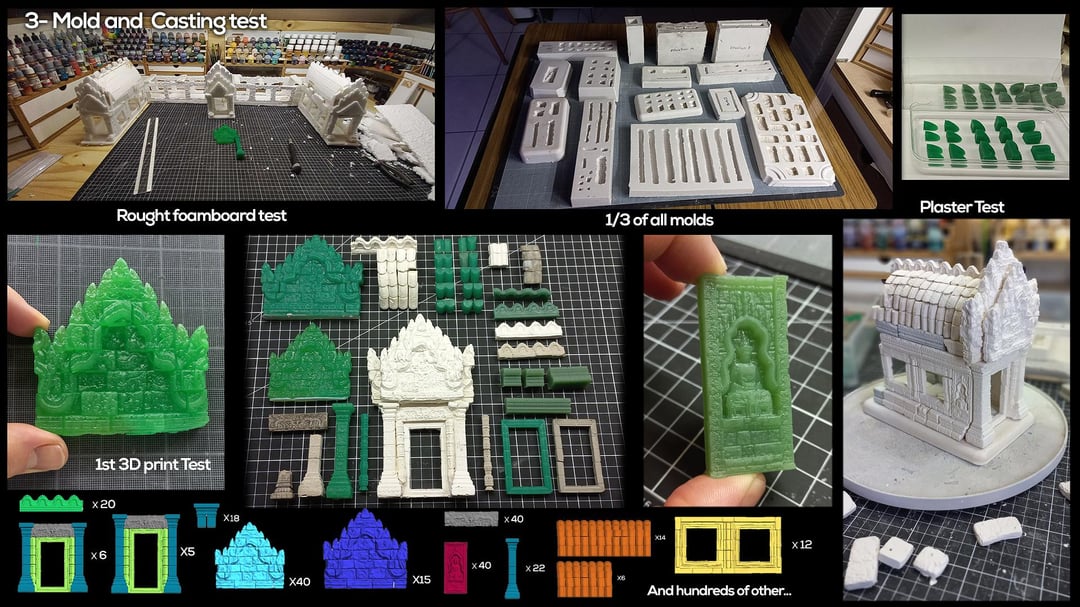
I modelled each piece (one of each type) in low poly and then in high poly to achieve maximum detail, which I 3D-printed (UV laser), and from which I made a thick silicone mould. I made a first version in plaster to test assemmbly then concret.
I then tested several cement mixes to achieve something solid and quick curing.
Concret : Standard Portland concret has two problems: it contains chemical additives that I’m not too keen on for delicate animals (hence that characteristic smell) and it takes a LONG time to cure (24h+). Furthermore, with slightly acidic water to avoid mold (due to the technical shrimp substrate), I needed something else, and I discovered Prompt cement: resistant to seawater, odourless (it’s almost pure cement) and ULTRA-FAST curing, it gets hot and hardens in less than 1–2 minutes. When pouring/molding , strong vibration is required to prevent bubbles (use vibrating tools of your choice ( ͡° ͜ʖ ͡°) ).
Living surface : Before assembly, I place each piece in my outdoor pond, which, after a few weeks, gives them a lovely green tint 🍀; and as the water outside is quite hard (limestone region), it seeps into all the pores and strongly sets the cement by forming microcrystals. So each piece becomes incredibly strong; I even find it really hard to break them by hand.
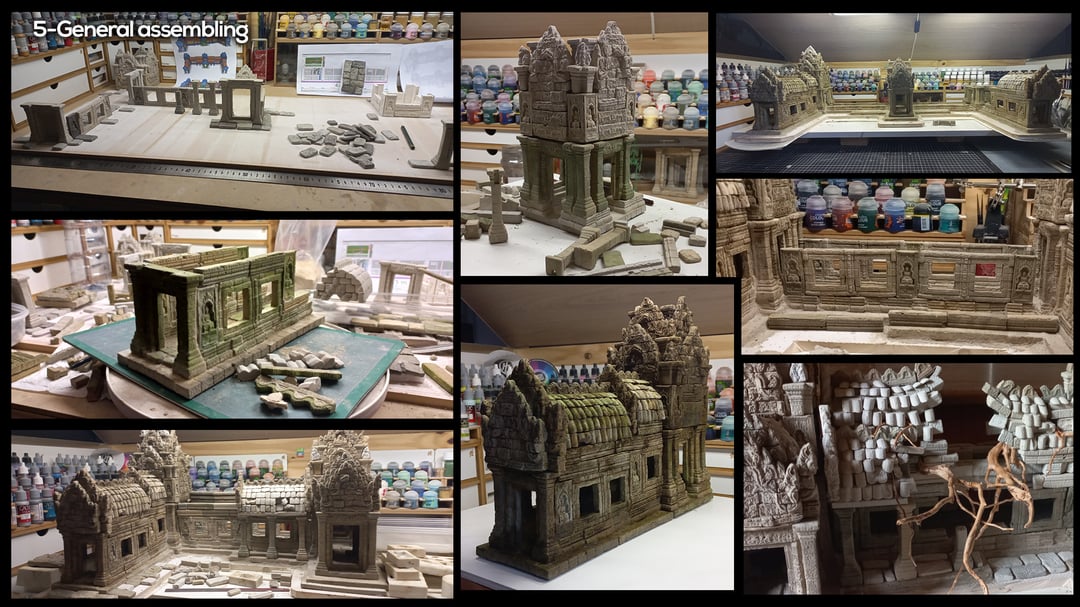
Assembly : Once the pieces are green and dry, I glue them together using instant plant glue (a kind of cyanoacrylate but safe for aquariums) and secure them with fresh cement for the structural parts bearing weight. I chose to cast each piece separately in order to achieve a realistic sense of chaos and faithfully reproduce the general disarray of the pieces caused by a partial collapse and time, thereby avoiding any visible repetition. I thought about making larger moulds, but I would have had to use a lot more UV resin (which is expensive), and with the holes, the models would have been very difficult to remove.
The entire lower half of the temple is assembled as a single unit fixed to a single cut-to-size piece of kitchen tiling, to ensure the water channel is watertight. The tiling gives me a perfectly flat surface overall, which is suitable for the expansion of the moss and can easily support the weight of the temple. As for the roofs, I’ve found a way to create a sort of central piece that supports the beams, allowing me to create gaps whilst still keeping the whole structure stable. But all the upper sections (roof and tower) can be dismantled in case an animal gets stuck or if I need to access the area behind.
The 3 towers are special because I’m going to use them as ‘flower pots’ for some very uncomon flowering moss used that way, i will talk about moss next time.
Bonsai and soil : I came up with the idea for the bonsai quite late on; at first I thought I’d just make the roots by hand, but then I thought, ‘Why make it simple?’ So I found a way to create an inverted void inside the right corridor, creating a sunken space, but one pushed upwards by a tree like Angkor Wat. For the other roots, I already have a method (using silicone-coated ropes + coconut fibre + moss).
I’ve found that with a potting mix mainly made up of coconut fibre, bonsai tolerate high humidity VERY WELL, as coconut fibre is acidic, which kills off any harmful bacteria and mold so roots CAN'T ROT. I've managed to grow a ficus in waterlogged soil for the past three years, it is still alive.
The animated GIF showing the temple’s construction isn’t entirely accurate at the moment, as certain areas (the towers, some of the roofs, and the bonsai area) proved problematic and I had to do them differently; I’ll update the animation later.
The rest of the production is in the pipeline, and I’m still thinking about the best way to do a whole lot of things, The same goes for choosing plants; I’m about 80% sure, both for the above-water and underwater parts. I’ll talk about the rest of the equipment soon.
The next steps are to build the bookshelf (in oak) and the 1st tempered glass terra.
Thank you for reading, next update soon.
by Hierographix-3D
2 Comments
Thank you for interesting read.
I’m looking forward to future updates.
While my 260 gallon leopard gecko enclosure does use 3D printed structures, they operate like a nesting doll in the sense that each floor nestles down onto the one below it, which locks it in place and the only way to remove them is to pull them straight up. You can utilize a similar design concept since it’s something you mentioned as a necessity (and it’s one I agree with), and I don’t see why it cannot be done with natural materials to fit the parameters of your concept.
Additionally, I try to encourage anyone building custom enclosures to utilize rear/side access doors so that you can get into hides and tunnels without needing to dismantle anything or, more importantly, risk stressing out your herp as it sees its home fall apart around it. https://www.reddit.com/r/HerpHomes/s/4IrtYGRXNb this is how I achieved my doors